Pages

Friday, October 21, 2011

Red Door No More

From the moment we moved into our house I hated our red door.  I'm not sure why, but I think it had something to do with all of the red.  I mean, our house is already made up of red brick, so why on earth would I want to add to that?  After searching the internet, my husband and I found a color we could agree on.  He wasn't that difficult to convince I showed him one picture and he said "deal, when do you want to paint it?"  Surprising since usually the reaction is more like "why do you need to paint it?," "I hate when you want to paint," "it looks fine the way it is."  So thank you for that love!  Anyway we agreed on painting our door something similar to this.
Original Green Door Plan
Well, once we got to Home Depot we had already vetoed using a paint brush and bucket so spray paint was the way to go.  Turns out, Home Depot had shades of green, but none like this green.  We thought about searching for spray paint somewhere else, but we were too lazy and didn't care THAT much about this green. So, we grabbed a paint swatch that was similar to our brick color and began searching through the colors of spray paint they did have and we choose...
Red Door Gone!
Rustoleum Painter's Touch in granite and satin finish! I love it! Now we just have to paint our other front door...yes, we have two! Weird, right?  We bought two cans of spray paint and together they cost us about seven dollars (plus we still have about half a can left)!  So if you're looking for a cheap door update this is the way to go!  What color do you like to dress up your front door with?  


Kasie

Thursday, October 13, 2011

Pinterest Fever

For those of you who might not have caught it yet, beware because it is extremely contagious!  Pinterest is a lovely way to have a catalog of the ideas you love without having to tear pages out of magazines, print pictures off of the internet, or even writing them down.  Now don't get me wrong, I'm all for doing that too, but Pinterest simplifies this.  All you need to do is request an invite, and a pin it button, and start pinning.  Pins can be separated into different boards for different ideas such as cooking, home improvement, decorating, etc.  
One of my boards that I am just dying to apply to my house is Master Bedroom Inspiration.  Some of the ideas I absolutely love from this board are 
This DIY headboard
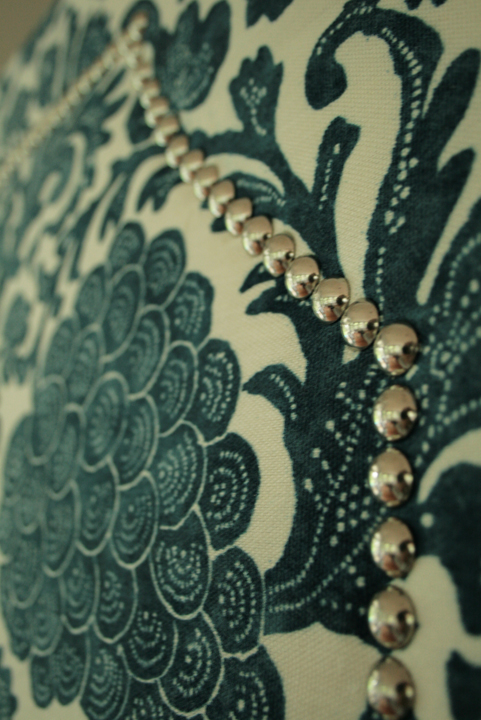
I absolutely love the entire design of this headboard.  Don't be surprised if there is a post about a DIY headboard sometime in the future because we currently don't have a headboard and this will be a great way to design our own within our budget. Yes!


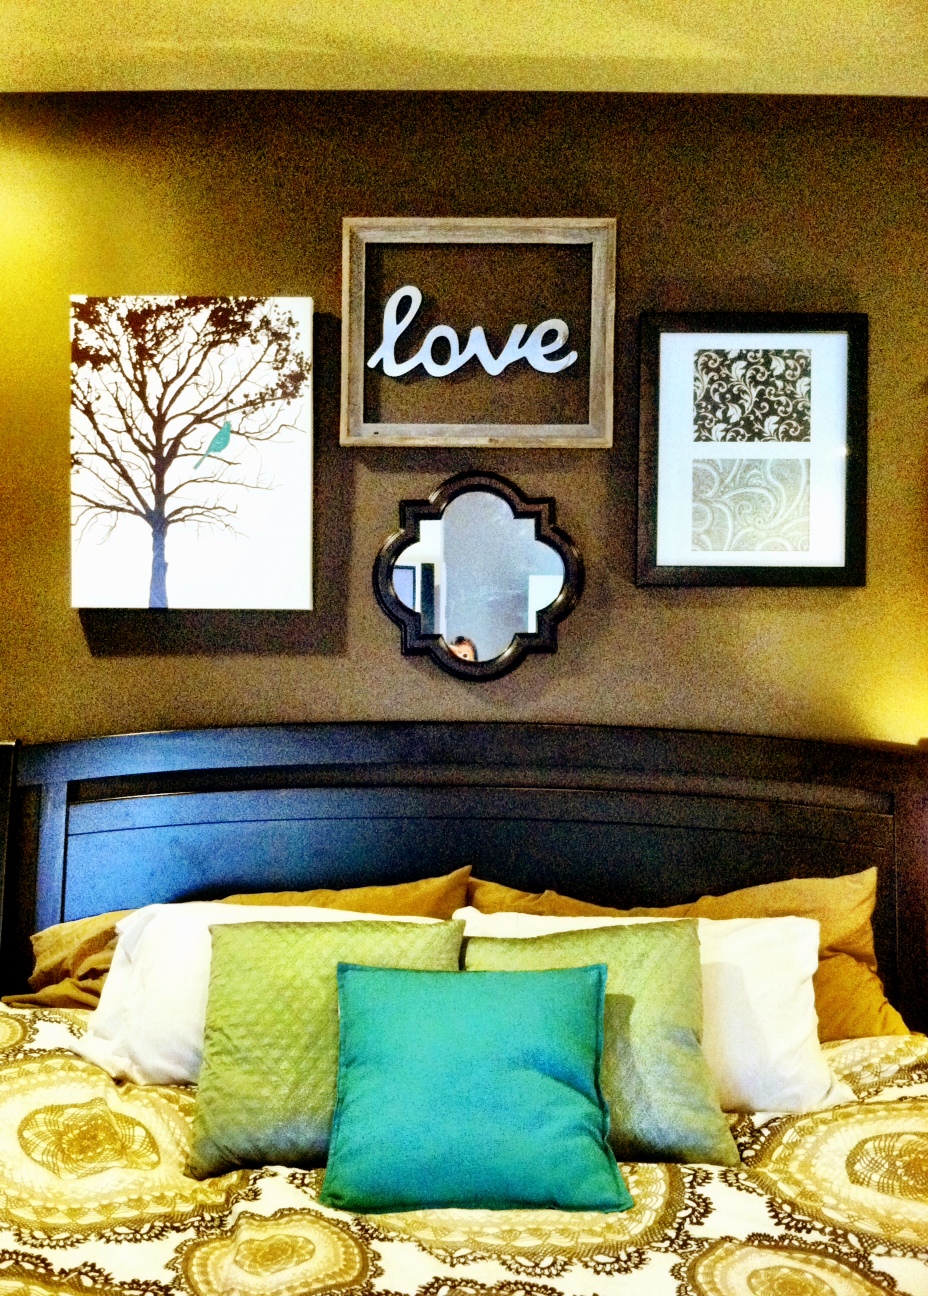
Next up we have this lovely image
Above the Headboard Artwork
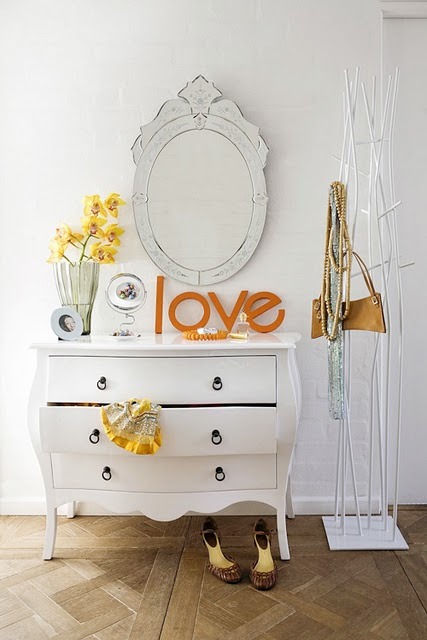
I love this idea.  I mean, who doesn't want the word "love" above their headboard in the master bedroom?  Unfortunately our bed is in front of a window so we won't be adding the artwork above our bed, but we can mix it into other places in the room like above our nightstands or on the dresser like this
Dresser Decorations
I love the white dresser, mirror, and of course, the word LOVE.  I hope to try to add some of these decor ideas into our own master bedroom soon, but until then I will just continue to drool over them and think up some ideas of how I can incorporate them into our design.

For more decor lovin' pictures for our master bedroom or other inspiration for our house check out my Pinterest by hitting the "follow me on Pinterest" button to the right ---->.  

Maybe I will see some of the readers ideas floating around on Pinterest, but until then why don't you share what decor you are currently loving for your house?  


Kasie

Wednesday, October 12, 2011

Update for DIY Rosette Wreath

Lately I have been swamped with homework and so all of my spare time has been dedicated to hanging out with my sweet little family.  I finally have a break from homework (until tomorrow) so I thought I would share the "how to" part of the DIY Rosette Wreath.
While searching through pinterest I found these lovely rosettes from CraftaholicsAnonymous.  I did not follow her exact method to create the rosettes, but it was quite similar to her style.  If you make your own you will understand what I mean because you will more than likely find a way that works best for you and run with it.
To start, I cut a strip of fabric.  Any fabric will work, but I used a cream printed fabric and a plain black fabric to make my rosettes.  I did not measure out any certain length (mostly because I didn't feel like getting up to get a tape measure) I just eyeballed what looked to be about two feet in length since she used a length close to two feet then cut a width close to three inches.  When using a thicker fabric I would recommend making the width thinner because the rose could get pretty chunky if you don't.  My black fabric was fairly thick and it was more difficult to work with because of the width, so the second time I did my black rosette I made the width smaller. Next fold your strip in half and tie a knot in it.
Once I tied the knot I hot glued the extra at the end of it to the back of the knot then hot glued that to a two inch circle of fabric.  Next, I started twisting and wrapping the fabric around the original knot layering it like flower petals would.  To help hold the twists in place I applied hot glue whenever I felt it was necessary.  When I was finished I cut off any of the extra two inch circle that might have been hanging out.  In the end my rosettes looked like this.
Thankfully, I improved as I continued, but for my first shot at it, this little rosette wasn't too bad!  I did the same for the jute rosette except I almost doubled the length used for the fabric rosette and folded the length in half so that the jute had a bit more thickness to it.  I just tied the knot and followed the same instructions for the fabric rosette, but when wrapping the jute rosette I found it easier to pin the center of the rosette down to cardboard so that it was easier to work with and wasn't moving all over the place. If you didn't understand any of this, then just Google it, there are tutorials everywhere for these things. I think my next rosette project will be these lovely pillows from this blog for our master bedroom.

Kasie


Friday, October 7, 2011

Dressing Up Our Door with a DIY Rosette Wreath


After seeing many DIY Wreaths on Pinterest like this one, I decided to try my hand at some DIY rosettes to stick on my super cheap wreath from Michaels.   So, in my day full of dirty diapers, homework, cleaning, and cooking I snuck in a little crafting and ended up with this bad boy

Rosettes + Cheap Wreath = Success
I will be back soon with the details, but for now I'm off to bed!


Kasie 

Wednesday, October 5, 2011

Old Table Redesigned into Our Own Beauty


When we first moved into our beautiful little house almost two years ago I had never even considered revamping old furniture with a new coat of paint or sanding it down and re-staining it to fit our style.  Pretty soon after we got married and I moved in I was going crazy because our furniture that we had wasn't exactly my cup of tea, but it was all we could really afford...free.  This was when I began the process of learning ways to revamp our furniture.  Honestly, anyone can do it all you need is a little motivation and some researching to figure out how the heck it can be done.
We had a dining room table given to us from my in-laws.  I wasn't in love with it, but it was better than the alternative of nothing.  I'm not sure why, but I have never really loved this particular light stain (I'm not even sure it counts as a stain, I think it just had a polyurethane coat on it...and a thick coat at that). Let me show you what we started out with:


 All she needed was a little loving to make her ours.  To do this I used

  • a belt sander
  • 80 grit sand paper
  • 120 grit sand paper
  • 220 grit between coat sand block
  • Minwax Red Mahogany 225 stain
  • Minwax Fast Drying Polyurethane 
  • Wood Conditioner (optional)
  • Foam brush
  • old t-shirt
  • tack cloth
First I started out by sanding with a plain jane electric sander...that definitely did not work.  It took days to sand and even when I thought all of the old finish was gone, when I stained it the stain would not penetrate the wood all over because there were large areas where not all of the finish had been removed.  This is when my Dad (who saves me from all of my big household problems) let me borrow his belt sander (sidenote: this took forever to get since I like about 12 hours away...I have yet to return it, sorry Dad).  If you can borrow a belt sander I HIGHLY recommend it! So, once I got that bad boy I made a trip to Home Depot to pick up some appropriate size sand paper.  This sander needed 3" x 21".  Be sure to look at your belt sander to check (it should show somewhere on the sander with the product number etc.). Once I had the belt sander the process moved pretty fast.  I sanded first with the 80 grit sand paper along the wood grain, followed by the 120 and then the 220.  Next, I wiped the dust off with a tack cloth, then used a damp paper towel to remove any other dust/dirt.  This is where the optional wood conditioner may be used.  Some types of wood will need this more than others, but I skipped the wood conditioner and went straight to the stain.  To do this I used a foam brush and brushed in long streaks along the wood grain, let the stain soak in for 5-15 minutes (depending on the instructions for the stain you choose and how deep you want the stain to be).  Now, I wiped the excess stain off with an old t-shirt and let the coat dry for 2+ hours (this also depends on the stain you choose so be sure to check the instructions).  This is what my table looked like at this point.

During the process Stain drying


Again
 If the stain was not yet as dark as I wanted, I added another coat of the stain, but did NOT sand in between layers. Sanding in between layers of stain will just remove the stain.  I ended up adding 3 coats all together since I have a love for deep, richly colored stains.  Once all of the coats of stain have been applied and dry you will want to grab a new foam brush and add a coat of polyurethane to protect the wood.  I applied this in long, smooth strokes along the wood grain like I did for the stain, but this does not get wiped off like the excess stain did.  For the polyurethane I used I allowed it to dry 4-6 hours before gently sanding with my 220 grit sand block and adding a new coat of poly.  I only applied two coats of poly, but if you want to add a third, just repeat these steps (dry time, sand with 220 grit sand block, add third coat).  Once the final coat is added all that is left is to allow it to dry.  I waited 24 hours before using my table (gently).  If you have kids, I would suggest waiting a little longer so that if there are any spills or bangs, you know the poly coat can handle it.  By the end, my table turned out beautiful.


Our new-to-us beautiful re-stained table


I love the deep colored stain
I definitely love the outcome and it has inspired me to redesign our not so fabulous dining room.  What do you think? Have you had any experiences with re-finishing old furniture?


Kasie 

Saturday, October 1, 2011

New Digs for Little Girl C


There is one room in this house that started to transform incredibly fast.  Why did it have to transform fast?  Well, it's a nursery, so pretty much we had about nine months to get this little room painted, put the crib together, paint old our old furniture to turn it in to her new furniture, and then add decorations afterward. During this nine months my husband happened to be gone at basic training and AIT, so really, we ended up with about ten weeks towards the end of my pregnancy to finish all of this.  Now that our sweet little girl is here, the room needs some extra loving as far as decorations go, but there will be more on that later.  In my previous post I mentioned that I had to patch huge gashes in the walls of our home.  Let me tell you, it was NOT fun.  


Here is how the little room started out when we first bought the house.


And again


These are the previously mentioned holes after some patching.
When I first started the prepping for painting the room I had no idea what was ahead of me.  These were only some of the holes and they were all about this size. This was not an enjoyable experience and I would definitely like to find another method for patching the next time I find them in our home. If any of you have tips, PLEASE feel free to let me in on them.


So, after the process of patching was completed, the painting could finally begin.  We originally wanted a gender neutral nursery, but when we went to Lowe's we came out with something much different in mind.


After the room was painted, in went the crib and we started on the furniture.  I'm sorry for the lack of before pictures for these, but imagine the dresser a very dark green, and the table to be a light purple. Got an idea of the before color in your head? 


These are both spray painted with Rustoleum's Heirloom White
Quite an update from their previous state, and both were completely free since the table was mine before I was married and the dresser was his.


Now, about this dresser.  I'm not sure if you might have noticed, but it is lacking knobs.  The ones that were on it before were just round wooden balls and I wasn't crazy about them.  I've always liked the look of crystal knobs, so I wanted to give them a try.  All I needed were some knobs (which were given to us), the screws, and a screw driver. Easy enough.  

Here the dresser is after the knobs were added
I'm actually not sure how I feel about them, but we will give it a little bit of time and see.  I still have a ton of decorating to do in this room, like adding a mirror above her dresser, putting pictures up, hanging curtains, etc.  I'm actually working on some decorations for her room now, so come on back and check them out!


Kasie